Experimenting with Salesforce Architecture, AI, Data Analytics, and Coding
-

Scalable Salesforce Integrations on a Shoestring Budget – Recorded video available!
I’m happy to share that Salesforce published the recording of my first Dreamforce session (luckily just slides and voice 🙂 )! If you missed it or if you want to re-listen some parts, you can watch it below: Scalable Salesforce Integrations on a Shoestring Budget – Dreamforce ’19Giuseppe Cardace, Sébastien Virtel Follow the how-to guide…
-

The A.I. Dilemma: Navigating the Risks and Opportunities of Artificial Intelligence
I recently watched the “A.I. Dilemma” video, which discusses the risks and benefits of Artificial Intelligence (A.I.) and the urgent need to put guardrails in place to avoid misusing this technology. I recommend watching the video and enrolling in the “Foundations of Humane Technology” course from the Center for Humane Technology to explore the dual…
-
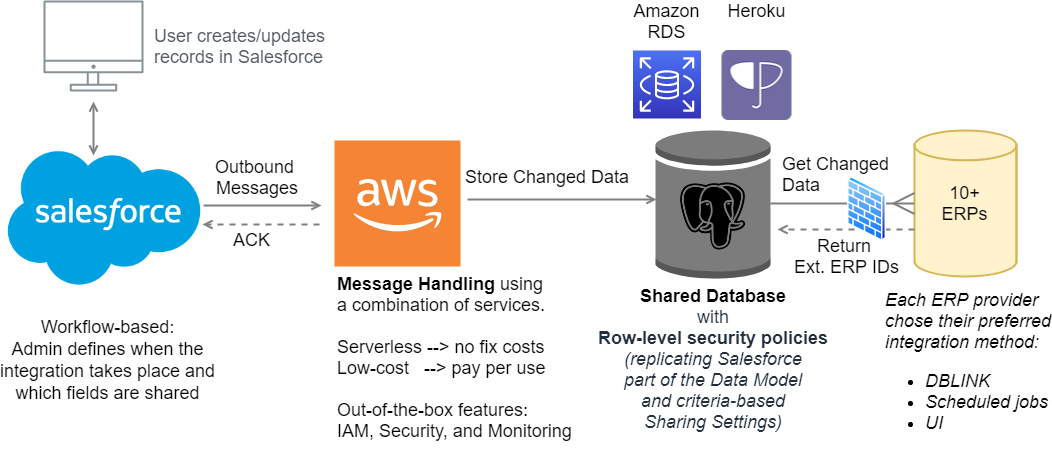
Scalable Salesforce Integrations on a Shoestring Budget – Step-by-Step Guide
Welcome to this step-by-step guide on how to implement scalable, low-code and low-budget near real-time Salesforce integrations with third-party systems.In this post, I will describe how to reproduce the live demo I did during my first Dreamforce session . EDIT: watch the slides on SlideShare or download the PDF The reason behind the presented architecture…