Welcome to this step-by-step guide on how to implement scalable, low-code and low-budget near real-time Salesforce integrations with third-party systems.
In this post, I will describe how to reproduce the live demo I did during my first Dreamforce session .
EDIT: watch the slides on SlideShare or download the PDF
The reason behind the presented architecture is that I didn’t have any on-premise infrastructure and I had a very limited IT budget so I couldn’t afford a complete ESB.
You will learn how to combine Salesforce Outbound Messages, AWS services, as well as Talend Open Studio for Data Integration.
I promise you it will be very cheap (totally free up to a few thousand records and few hundred thousand transactions), but it takes some time to configure especially if you’re not familiar with some of the tools involved, so please be patient.
Here’s a quick index of the topics:
- Context
- Architecture Schema
- Prerequisites
- Setting up a PostgreSQL DB on Heroku
- Create the database tables
- Outbound Messages in Salesforce
- Amazon Simple Queue Service (SQS)
- Amazon API Gateway
- Processing your messages with a Talend ETL job
- AWS Lambda
- AWS CloudWatch
Context
I needed to integrate, in near real-time, a single Salesforce org with a growing number of ERP systems used by acquired subsidiaries of the Acrotec group.
Given the limited amount of IT budget and no on-premise servers to run my integration jobs, after some research, I found a reasonable solution which I summarize below.
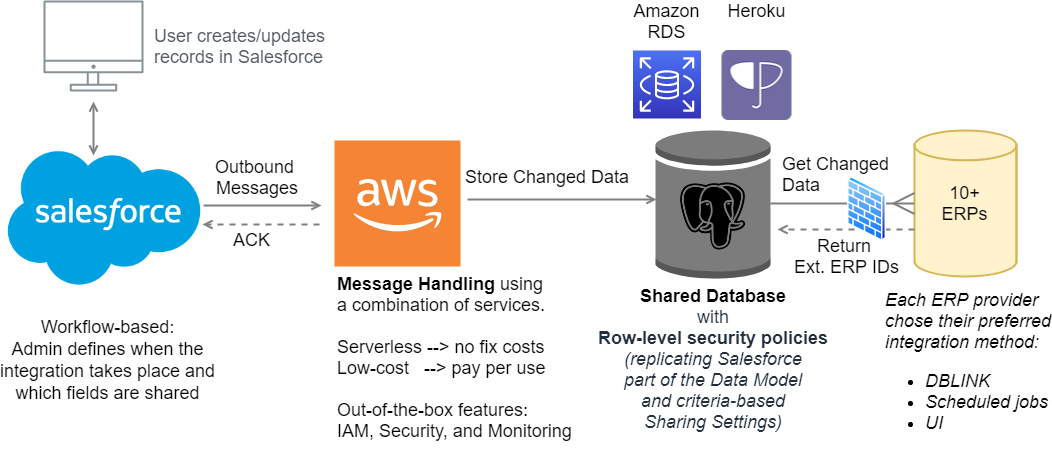
Architecture Schema
You can find below a schematic view of what we’re going to realize in this post:

High-level Architecture 
Detailed Architecture
Prerequisites
In order to follow the steps in this post, you’ll need:
- A Salesforce org (a free developer org is enough to try this demo)
- An account on AWS (you can register here)
- An account on Heroku (you can register here)
- This one is actually optional, if you didn’t have an account on AWS you are probably eligible for a free RDS database on AWS so you don’t need to create a free database on Heroku.
- Set up your Eclipse IDE (or IntelliJ) with AWS Toolkit (instructions here)
- This will require installing Java JDK 8 and configure your dedicated AWS user. Follow the AWS instructions very carefully.
As they might change over time I’m not copying them here.
- This will require installing Java JDK 8 and configure your dedicated AWS user. Follow the AWS instructions very carefully.
- Talend Open Studio for Data Integration (or its commercial version) installed
- Have some basic knowledge of PostgreSQL, the SQL language and a PostgreSQL compatible client like pgAdmin or DBeaver
Setting up a PostgreSQL database on Heroku
If you already have a PostgreSQL database reachable from Internet, you can skip this section and go to table creation.
Once you’ve logged in on Heroku, all you need to do to obtain a free Heroku Postgres database is to create a new app: https://dashboard.heroku.com/new-app
Choose an appropriate name (Heroku will make sure it is not already taken by someone else) and select a region close to you. I’ll go with Europe.

By default, after creating the app you’ll see the “Deploy” page, but we’re not going to upload any code from a git repository, so please switch to the “Resources” tab:

Under “Add-ons“, search for “Postgres” and select “Heroku Postgres“:

Now you can provision a free “Hobby Dev” tier PostgreSQL DB to your application (which will be limited to 10’000 records and 20 concurrent connections).

If you need additional space for your proof of concept you can consider different plans from Heroku or look at the pricing from AWS or Azure.
After clicking “Provision“, a new resource will be attached as DATABASE on your app and, if you switch to the “Overview” tab, you will also see it there in the list of Installed add-ons:

Click on “Heroku Postgres” under the Installed add-ons to be redirected to https://data.heroku.com where you can monitor all databases you have on Heroku.

Click on “Settings” tab and on the “View Credentials…” button to take note of your credentials to connect to the database.

Follow the link to the next page to create the tables that will receive your data and continue the configuration.
Leave a Comment