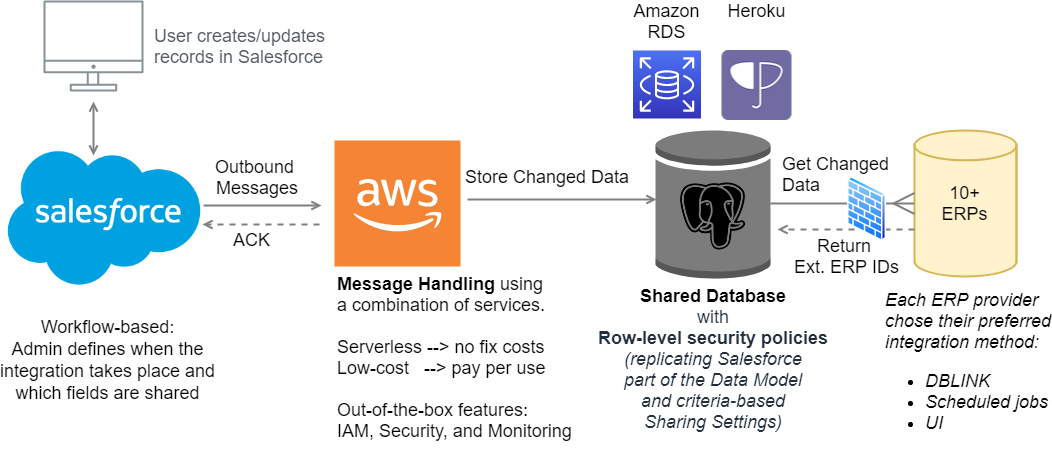
Before configuring the endpoints, we need to make sure that we have a place where to store the messages we receive from Salesforce.
Amazon Simple Queue Service (SQS)
Amazon Simple Queue Service (SQS) is a fully managed message queuing service that enables you to decouple and scale microservices, distributed systems, and serverless applications. SQS eliminates the complexity and overhead associated with managing and operating message oriented middleware, and empowers developers to focus on differentiating work.
Source: https://aws.amazon.com/sqs/
Using SQS, you can send, store, and receive messages between software components at any volume, without losing messages or requiring other services to be available.
Finding the Simple Queue Service on AWS
After logging in the AWS Management Console, you’ll get to the home page where you can search all available services.
Since Amazon has hundreds of services available there, they put a convenient search box “Find Services” on the home page. Go ahead and search for “SQS”, then open the Simple Queue Service configuration.

Creating a queue
Click on “Create New Queue“, define the queue name and chose the type “Standard” (unfortunately FIFO queues do not support triggers).
NOTE: If you absolutely need to guarantee the message order AND have Lambda functions triggered, you can replace SQS with Amazon Kinesis (a managed Apache Kafka service)… it works great but you pay for it even when you don’t use it.
EDIT November 27th 2019:
Good news! AWS announced that FIFO queues now support triggering Lambda functions: https://aws.amazon.com/about-aws/whats-new/2019/11/aws-lambda-supports-amazon-sqs-fifo-event-source/

Using naming conventions could be very helpful if you have different environments (e.g. production and partial copy UAT sandbox).
I named my queues sf_prod_account and sf_prod_contact.
This way, when sorting them alphabetically by Name, I can group all Salesforce queues together, then group them by environment and finally by sObject.
Selecting a queue in the list, you can see its details.
Please copy the URL values or keep this page open in a separate tab because we would need to enter those values in the API Gateway configuration.

Amazon API Gateway

Go back to the AWS Management Console and search for API Gateway.
This service allows you to design and manage your own APIs (REST or WebSocket) by defining what happens when a client reaches a given resource and HTTP method.
Once the API is configured you can deploy it in different stages, create a versioning, etc.
Create a new API and configure its resources
The first step is to create a new API:

Leave all the options as they are, choose a name for your API and click “Create API“

Now we need to define one resource for each integrated object (e.g. /account, /contact) in order to create different endpoints for the Outbound Messages.
Click on “Actions” and then select “Create Resource“:

Enter a Resource Name and click on Create Resource:

Integration Request
Configure the POST method
Add the POST method to the new resource:

Use the following settings:
Integration Type = AWS Service
AWS Region = choose one close to your Salesforce org
AWS Service = Simple Queue Service (SQS)
HTTP method = POST (i.e. send a message into a queue)
Action Type = Use Path Override (to select which queue will receive the message). Path override = the URL path you copied from your SQS configuration (just the path after “https://sqs.eu-west-1.amazonaws.com/”)
>> e.g. [your-account-id]/sf_prod_account
NOTE: After deploying the API, you can define variables for each stage and replace “prod” with “${stageVariables.stage}”. This way, messages will go to the relevant queue depending on the deployment stage.
Execution Role = create an IAM Role to Delegate Permissions on SQS and CloudWatch

Below a few screenshots for you to double-check the settings:


HTTP Headers & Mapping Templates
Copy the following settings for the headers and the mapping templates

Setting the text/xml template to “Action=SendMessage&MessageBody=$util.urlEncode($input.json(‘$’))” we are communicating with the SQS API and pass it the required parameters “Action” and “MessageBody”. Since SQS needs a JSON message body, you can include your XML message as a String, escaping the quotes, using $util.urlEncode($input.json(‘$’)).
Integration Response
Here, we configure the response that we’re going to send to Salesforce when the message has been successfully written in the SQS queue:

Mapping Templates
Content-Type = application/soap+xml (what Salesforce expects as response)
Template =
#set($inputRoot = $input.path('$'))
<?xml version="1.0" encoding="UTF-8"?><soapenv:Envelope xmlns:soapenv="http://schemas.xmlsoap.org/soap/envelope/" xmlns:xsd="http://www.w3.org/2001/XMLSchema" xmlns:xsi="http://www.w3.org/2001/XMLSchema-instance"><soapenv:Body><notificationsResponse xmlns:ns2="urn:sobject.enterprise.soap.sforce.com" xmlns="http://soap.sforce.com/2005/09/outbound"><Ack>true</Ack></notificationsResponse> </soapenv:Body></soapenv:Envelope>
Method Response

Deploy your API
Repeat the above steps for each object and finally deploy your APIs:


You can now obtain the “Invoke URL” (the root of all endpoints) and you can also set your stage variable which can be used anywhere in your configuration in this format:
${stageVariables.variableName}

Set your Outbound Message Endpoints
Now you can copy the Invoke URL of a given POST method and paste it as the Endpoint for the corresponding Outbound Message:

Now you can already verify that your messages are leaving Salesforce and getting stored in their relevant queue on SQS:
- activate the workflow rules
- insert or edit a record
- check that under Setup > Monitoring > Outbound Messages there are no errors
- check that there is a message in the SQS queue (if not, look on CloudWatch for hints on what could be wrong)
In the next page we’ll see how to create a Talend job to process the XML message and store its data into a database.

Leave a Comment