Create the database tables
I created the tables automatically using Talend (you can set it to create them if they don’t exist) but if you’re not familiar with it, it’s probably faster to use the DDL statements provided below.
To connect to the database you can use any client, then run the following statements:
CREATE TABLE "Account" (
 "Id" varchar(18) NOT NULL,
 "Name" varchar(255) NOT NULL,
 "Type" varchar(255) NULL,
 "ParentId" varchar(18) NULL,
 "BillingStreet" varchar(255) NULL,
 "BillingCity" varchar(40) NULL,
 "BillingState" varchar(80) NULL,
 "BillingPostalCode" varchar(20) NULL,
 "BillingCountry" varchar(80) NULL,
 "Phone" varchar(40) NULL,
 "Fax" varchar(40) NULL,
 "AccountNumber" varchar(40) NULL,
 "Website" varchar(255) NULL,
 "OwnerId" varchar(18) NULL,
 "CreatedDate" timestamp NULL,
 "CreatedById" varchar(18) NULL,
 "LastModifiedDate" timestamp NULL,
 "LastModifiedById" varchar(18) NULL,
 "SystemModstamp" timestamp NULL,
 CONSTRAINT "Account_pkey" PRIMARY KEY ("Id")
);

CREATE TABLE "Contact" (
 "Id" varchar(18) NOT NULL,
 "AccountId" varchar(18) NULL,
 "LastName" varchar(80) NOT NULL,
 "FirstName" varchar(40) NULL,
 "Salutation" varchar(255) NULL,
 "MailingStreet" varchar(255) NULL,
 "MailingCity" varchar(40) NULL,
 "MailingState" varchar(80) NULL,
 "MailingPostalCode" varchar(20) NULL,
 "MailingCountry" varchar(80) NULL,
 "Phone" varchar(40) NULL,
 "Fax" varchar(40) NULL,
 "MobilePhone" varchar(40) NULL,
 "ReportsToId" varchar(18) NULL,
 "Email" varchar(80) NULL,
 "Title" varchar(128) NULL,
 "Department" varchar(80) NULL,
 "Birthdate" date NULL,
 "OwnerId" varchar(18) NULL,
 "CreatedDate" timestamp NULL,
 "CreatedById" varchar(18) NULL,
 "LastModifiedDate" timestamp NULL,
 "LastModifiedById" varchar(18) NULL,
 "SystemModstamp" timestamp NULL,
 CONSTRAINT "Contact_pkey" PRIMARY KEY ("Id")
);
You should now see the Account and Contact tables under the “public” schema of your PostgreSQL database:

The database is now ready to receive the data from Salesforce!
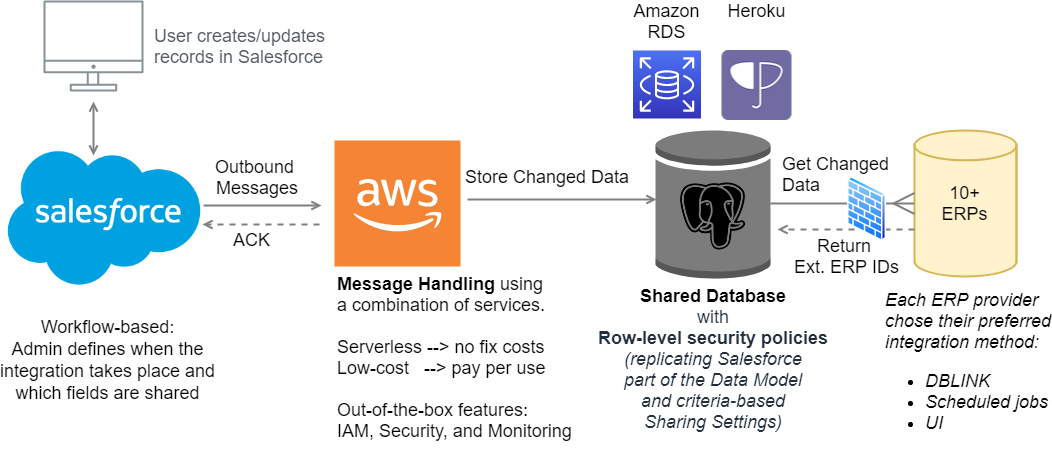
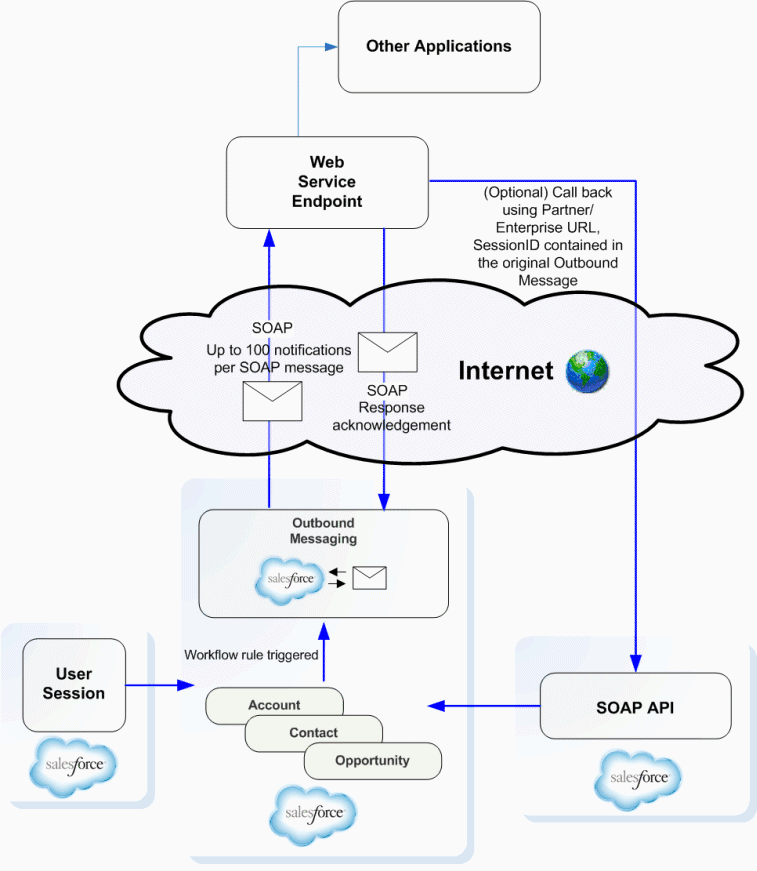
Outbound Messages in Salesforce
What are Outbound Messages?
As per Salesforce documentation: Outbound messaging allows you to specify that changes to fields within Salesforce can cause messages with field values to be sent to designated external servers.
Why did I choose them?
There are several reasons why I used Outbound Messages over other integration possibilities provided by Salesforce but the main one is that they are a declarative mechanism which can be configured by any Admins.
On the Salesforce side the integration stays easier to maintain: Admins can define which fields gets synchronized and when (e.g. business processes might change and specific criteria can be defined to prevent some changes to be communicated to external systems).
Let’s set them up!
To configure an Outbound Message, you just need to go to Setup on your Salesforce org and search for Outbound Messages:

On the right-hand side, click on “New Outbound Message” and select the Object you would like to integrate (e.g. Account):

Click “Next” and choose a meaningful name for your message:

Under “Endpoint URL” put a temporary URL (e.g. https://localhost).
We will change this later, after configuring our Amazon API Gateway.
By design you need to transfer at least the “Id” field, you can select additional ones from the “Available Fields” and move them under “Selected Fields” if you want to send your data within the outbound message (as I did in the demo).
Best Practices
Avoid receiving outdated information (as the order of messages is not guaranteed) by selecting just the Id field and checking the “Send Session ID“ option. You can then create a callback function that will use the Session ID to retrieve the updated information from Salesforce.
Make sure your messages are secured and that they are sent to a trusted endpoint, especially when you enable the Send Session Id option.
Obtaining the WSDL
After saving you will get the possibility to download a WSDL file containing the SOAP details (e.g. messages, types, etc.) which you can use to generate the service that will handle your outbound message and reply to Salesforce.
The SOAP Response Acknowledgment (ACK)
Providing a quick ACK response to Salesforce is extremely important because Outbound Messages are automatically resent for 24 hours until they receive such response and all retries are independent so you risk to receive an older update if you don’t handle it properly.
This is what the ACK response looks like:
<?xml version="1.0" encoding="UTF-8"?>
<soapenv:Envelope xmlns:soapenv="http://schemas.xmlsoap.org/soap/envelope/" xmlns:xsd="http://www.w3.org/2001/XMLSchema" xmlns:xsi="http://www.w3.org/2001/XMLSchema-instance">
<soapenv:Body>
<notificationsResponse xmlns:ns2="urn:sobject.enterprise.soap.sforce.com" xmlns="http://soap.sforce.com/2005/09/outbound">
<Ack>true</Ack>
</notificationsResponse>
</soapenv:Body>
</soapenv:Envelope>
Adding the Outbound Message to your business process
You can send Outbound Messages from any Workflow Rule or Approval Process.
Note: It is not possible to send Outbound Messages from Flow or Process Builder and, since Salesforce is more developing towards Platform Events, I doubt they will ever be integrated in those newer tools.
In my demo, I just created a workflow rule for each object and set them to run at every record change:

Ok, we’re all set to create the endpoints to receive our Outbound Messages!
Continue to the next page to learn how to start configuring the services on AWS.
Leave a Comment