

Welcome to this step-by-step guide on how to implement scalable, low-code and low-budget near real-time Salesforce integrations with third-party systems.
In this post, I will describe how to reproduce the live demo I did during my first Dreamforce session .
EDIT: watch the slides on SlideShare or download the PDF
The reason behind the presented architecture is that I didn’t have any on-premise infrastructure and I had a very limited IT budget so I couldn’t afford a complete ESB.
You will learn how to combine Salesforce Outbound Messages, AWS services, as well as Talend Open Studio for Data Integration.
I promise you it will be very cheap (totally free up to a few thousand records and few hundred thousand transactions), but it takes some time to configure especially if you’re not familiar with some of the tools involved, so please be patient.
Here’s a quick index of the topics:
- Context
- Architecture Schema
- Prerequisites
- Setting up a PostgreSQL DB on Heroku
- Create the database tables
- Outbound Messages in Salesforce
- Amazon Simple Queue Service (SQS)
- Amazon API Gateway
- Processing your messages with a Talend ETL job
- AWS Lambda
- AWS CloudWatch
Context
I needed to integrate, in near real-time, a single Salesforce org with a growing number of ERP systems used by acquired subsidiaries of the Acrotec group.
Given the limited amount of IT budget and no on-premise servers to run my integration jobs, after some research, I found a reasonable solution which I summarize below.
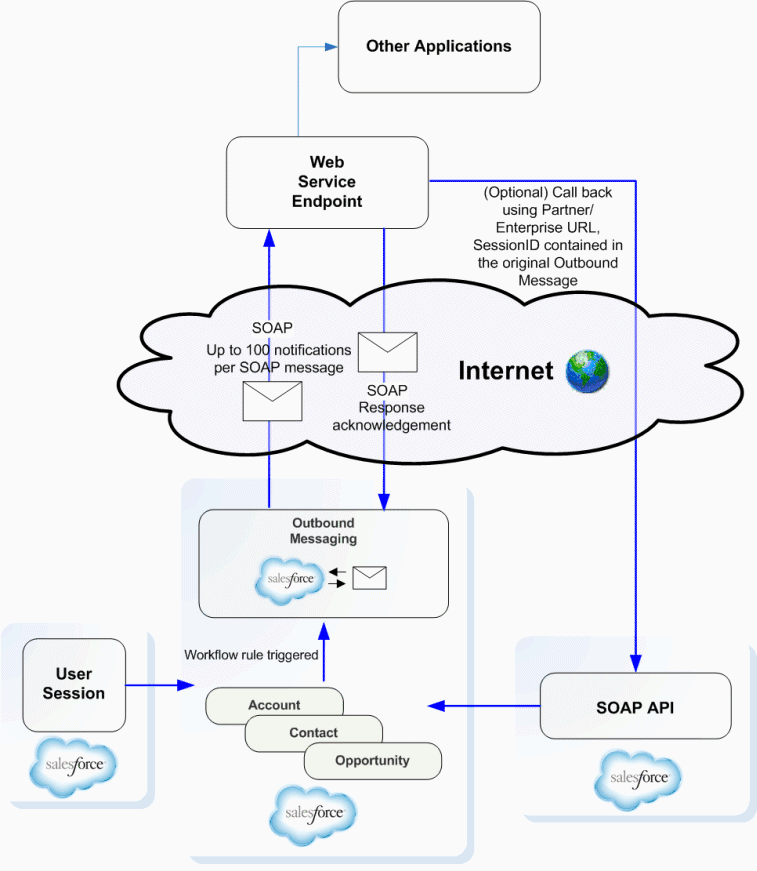
Architecture Schema
You can find below a schematic view of what we’re going to realize in this post:


Prerequisites
In order to follow the steps in this post, you’ll need:
- A Salesforce org (a free developer org is enough to try this demo)
- An account on AWS (you can register here)
- An account on Heroku (you can register here)
- This one is actually optional, if you didn’t have an account on AWS you are probably eligible for a free RDS database on AWS so you don’t need to create a free database on Heroku.
- Set up your Eclipse IDE (or IntelliJ) with AWS Toolkit (instructions here)
- This will require installing Java JDK 8 and configure your dedicated AWS user. Follow the AWS instructions very carefully.
As they might change over time I’m not copying them here.
- This will require installing Java JDK 8 and configure your dedicated AWS user. Follow the AWS instructions very carefully.
- Talend Open Studio for Data Integration (or its commercial version) installed
- Have some basic knowledge of PostgreSQL, the SQL language and a PostgreSQL compatible client like pgAdmin or DBeaver
Setting up a PostgreSQL database on Heroku
If you already have a PostgreSQL database reachable from Internet, you can skip this section and go to table creation.
Once you’ve logged in on Heroku, all you need to do to obtain a free Heroku Postgres database is to create a new app: https://dashboard.heroku.com/new-app
Choose an appropriate name (Heroku will make sure it is not already taken by someone else) and select a region close to you. I’ll go with Europe.


By default, after creating the app you’ll see the “Deploy” page, but we’re not going to upload any code from a git repository, so please switch to the “Resources” tab:


Under “Add-ons“, search for “Postgres” and select “Heroku Postgres“:


Now you can provision a free “Hobby Dev” tier PostgreSQL DB to your application (which will be limited to 10’000 records and 20 concurrent connections).


If you need additional space for your proof of concept you can consider different plans from Heroku or look at the pricing from AWS or Azure.
After clicking “Provision“, a new resource will be attached as DATABASE on your app and, if you switch to the “Overview” tab, you will also see it there in the list of Installed add-ons:


Click on “Heroku Postgres” under the Installed add-ons to be redirected to https://data.heroku.com where you can monitor all databases you have on Heroku.


Click on “Settings” tab and on the “View Credentials…” button to take note of your credentials to connect to the database.


Follow the link to the next page to create the tables that will receive your data and continue the configuration.
Create the database tables
I created the tables automatically using Talend (you can set it to create them if they don’t exist) but if you’re not familiar with it, it’s probably faster to use the DDL statements provided below.
To connect to the database you can use any client, then run the following statements:
CREATE TABLE "Account" (
 "Id" varchar(18) NOT NULL,
 "Name" varchar(255) NOT NULL,
 "Type" varchar(255) NULL,
 "ParentId" varchar(18) NULL,
 "BillingStreet" varchar(255) NULL,
 "BillingCity" varchar(40) NULL,
 "BillingState" varchar(80) NULL,
 "BillingPostalCode" varchar(20) NULL,
 "BillingCountry" varchar(80) NULL,
 "Phone" varchar(40) NULL,
 "Fax" varchar(40) NULL,
 "AccountNumber" varchar(40) NULL,
 "Website" varchar(255) NULL,
 "OwnerId" varchar(18) NULL,
 "CreatedDate" timestamp NULL,
 "CreatedById" varchar(18) NULL,
 "LastModifiedDate" timestamp NULL,
 "LastModifiedById" varchar(18) NULL,
 "SystemModstamp" timestamp NULL,
 CONSTRAINT "Account_pkey" PRIMARY KEY ("Id")
);

CREATE TABLE "Contact" (
 "Id" varchar(18) NOT NULL,
 "AccountId" varchar(18) NULL,
 "LastName" varchar(80) NOT NULL,
 "FirstName" varchar(40) NULL,
 "Salutation" varchar(255) NULL,
 "MailingStreet" varchar(255) NULL,
 "MailingCity" varchar(40) NULL,
 "MailingState" varchar(80) NULL,
 "MailingPostalCode" varchar(20) NULL,
 "MailingCountry" varchar(80) NULL,
 "Phone" varchar(40) NULL,
 "Fax" varchar(40) NULL,
 "MobilePhone" varchar(40) NULL,
 "ReportsToId" varchar(18) NULL,
 "Email" varchar(80) NULL,
 "Title" varchar(128) NULL,
 "Department" varchar(80) NULL,
 "Birthdate" date NULL,
 "OwnerId" varchar(18) NULL,
 "CreatedDate" timestamp NULL,
 "CreatedById" varchar(18) NULL,
 "LastModifiedDate" timestamp NULL,
 "LastModifiedById" varchar(18) NULL,
 "SystemModstamp" timestamp NULL,
 CONSTRAINT "Contact_pkey" PRIMARY KEY ("Id")
);
You should now see the Account and Contact tables under the “public” schema of your PostgreSQL database:


The database is now ready to receive the data from Salesforce!
Outbound Messages in Salesforce
What are Outbound Messages?
As per Salesforce documentation: Outbound messaging allows you to specify that changes to fields within Salesforce can cause messages with field values to be sent to designated external servers.

Why did I choose them?
There are several reasons why I used Outbound Messages over other integration possibilities provided by Salesforce but the main one is that they are a declarative mechanism which can be configured by any Admins.
On the Salesforce side the integration stays easier to maintain: Admins can define which fields gets synchronized and when (e.g. business processes might change and specific criteria can be defined to prevent some changes to be communicated to external systems).
Let’s set them up!
To configure an Outbound Message, you just need to go to Setup on your Salesforce org and search for Outbound Messages:


On the right-hand side, click on “New Outbound Message” and select the Object you would like to integrate (e.g. Account):


Click “Next” and choose a meaningful name for your message:


Under “Endpoint URL” put a temporary URL (e.g. https://localhost).
We will change this later, after configuring our Amazon API Gateway.
By design you need to transfer at least the “Id” field, you can select additional ones from the “Available Fields” and move them under “Selected Fields” if you want to send your data within the outbound message (as I did in the demo).
Best Practices
Avoid receiving outdated information (as the order of messages is not guaranteed) by selecting just the Id field and checking the “Send Session ID“ option. You can then create a callback function that will use the Session ID to retrieve the updated information from Salesforce.
Make sure your messages are secured and that they are sent to a trusted endpoint, especially when you enable the Send Session Id option.
Obtaining the WSDL
After saving you will get the possibility to download a WSDL file containing the SOAP details (e.g. messages, types, etc.) which you can use to generate the service that will handle your outbound message and reply to Salesforce.
The SOAP Response Acknowledgment (ACK)
Providing a quick ACK response to Salesforce is extremely important because Outbound Messages are automatically resent for 24 hours until they receive such response and all retries are independent so you risk to receive an older update if you don’t handle it properly.
This is what the ACK response looks like:
<?xml version="1.0" encoding="UTF-8"?>
<soapenv:Envelope xmlns:soapenv="http://schemas.xmlsoap.org/soap/envelope/" xmlns:xsd="http://www.w3.org/2001/XMLSchema" xmlns:xsi="http://www.w3.org/2001/XMLSchema-instance">
<soapenv:Body>
<notificationsResponse xmlns:ns2="urn:sobject.enterprise.soap.sforce.com" xmlns="http://soap.sforce.com/2005/09/outbound">
<Ack>true</Ack>
</notificationsResponse>
</soapenv:Body>
</soapenv:Envelope>
Adding the Outbound Message to your business process
You can send Outbound Messages from any Workflow Rule or Approval Process.
Note: It is not possible to send Outbound Messages from Flow or Process Builder and, since Salesforce is more developing towards Platform Events, I doubt they will ever be integrated in those newer tools.
In my demo, I just created a workflow rule for each object and set them to run at every record change:


Ok, we’re all set to create the endpoints to receive our Outbound Messages!
Continue to the next page to learn how to start configuring the services on AWS.
Before configuring the endpoints, we need to make sure that we have a place where to store the messages we receive from Salesforce.
Amazon Simple Queue Service (SQS)
Amazon Simple Queue Service (SQS) is a fully managed message queuing service that enables you to decouple and scale microservices, distributed systems, and serverless applications. SQS eliminates the complexity and overhead associated with managing and operating message oriented middleware, and empowers developers to focus on differentiating work.
Source: https://aws.amazon.com/sqs/
Using SQS, you can send, store, and receive messages between software components at any volume, without losing messages or requiring other services to be available.
Finding the Simple Queue Service on AWS
After logging in the AWS Management Console, you’ll get to the home page where you can search all available services.
Since Amazon has hundreds of services available there, they put a convenient search box “Find Services” on the home page. Go ahead and search for “SQS”, then open the Simple Queue Service configuration.


Creating a queue
Click on “Create New Queue“, define the queue name and chose the type “Standard” (unfortunately FIFO queues do not support triggers).
NOTE: If you absolutely need to guarantee the message order AND have Lambda functions triggered, you can replace SQS with Amazon Kinesis (a managed Apache Kafka service)… it works great but you pay for it even when you don’t use it.
EDIT November 27th 2019:
Good news! AWS announced that FIFO queues now support triggering Lambda functions: https://aws.amazon.com/about-aws/whats-new/2019/11/aws-lambda-supports-amazon-sqs-fifo-event-source/


Using naming conventions could be very helpful if you have different environments (e.g. production and partial copy UAT sandbox).
I named my queues sf_prod_account and sf_prod_contact.
This way, when sorting them alphabetically by Name, I can group all Salesforce queues together, then group them by environment and finally by sObject.
Selecting a queue in the list, you can see its details.
Please copy the URL values or keep this page open in a separate tab because we would need to enter those values in the API Gateway configuration.


Amazon API Gateway


Go back to the AWS Management Console and search for API Gateway.
This service allows you to design and manage your own APIs (REST or WebSocket) by defining what happens when a client reaches a given resource and HTTP method.
Once the API is configured you can deploy it in different stages, create a versioning, etc.
Create a new API and configure its resources
The first step is to create a new API:


Leave all the options as they are, choose a name for your API and click “Create API“


Now we need to define one resource for each integrated object (e.g. /account, /contact) in order to create different endpoints for the Outbound Messages.
Click on “Actions” and then select “Create Resource“:


Enter a Resource Name and click on Create Resource:


Integration Request
Configure the POST method
Add the POST method to the new resource:


Use the following settings:
Integration Type = AWS Service
AWS Region = choose one close to your Salesforce org
AWS Service = Simple Queue Service (SQS)
HTTP method = POST (i.e. send a message into a queue)
Action Type = Use Path Override (to select which queue will receive the message). Path override = the URL path you copied from your SQS configuration (just the path after “https://sqs.eu-west-1.amazonaws.com/”)
>> e.g. [your-account-id]/sf_prod_account
NOTE: After deploying the API, you can define variables for each stage and replace “prod” with “${stageVariables.stage}”. This way, messages will go to the relevant queue depending on the deployment stage.
Execution Role = create an IAM Role to Delegate Permissions on SQS and CloudWatch


Below a few screenshots for you to double-check the settings:


HTTP Headers & Mapping Templates
Copy the following settings for the headers and the mapping templates


Setting the text/xml template to “Action=SendMessage&MessageBody=$util.urlEncode($input.json(‘$’))” we are communicating with the SQS API and pass it the required parameters “Action” and “MessageBody”. Since SQS needs a JSON message body, you can include your XML message as a String, escaping the quotes, using $util.urlEncode($input.json(‘$’)).
Integration Response
Here, we configure the response that we’re going to send to Salesforce when the message has been successfully written in the SQS queue:


Mapping Templates
Content-Type = application/soap+xml (what Salesforce expects as response)
Template =
#set($inputRoot = $input.path('$'))
<?xml version="1.0" encoding="UTF-8"?><soapenv:Envelope xmlns:soapenv="http://schemas.xmlsoap.org/soap/envelope/" xmlns:xsd="http://www.w3.org/2001/XMLSchema" xmlns:xsi="http://www.w3.org/2001/XMLSchema-instance"><soapenv:Body><notificationsResponse xmlns:ns2="urn:sobject.enterprise.soap.sforce.com" xmlns="http://soap.sforce.com/2005/09/outbound"><Ack>true</Ack></notificationsResponse> </soapenv:Body></soapenv:Envelope>
Method Response


Deploy your API
Repeat the above steps for each object and finally deploy your APIs:


You can now obtain the “Invoke URL” (the root of all endpoints) and you can also set your stage variable which can be used anywhere in your configuration in this format:
${stageVariables.variableName}


Set your Outbound Message Endpoints
Now you can copy the Invoke URL of a given POST method and paste it as the Endpoint for the corresponding Outbound Message:


Now you can already verify that your messages are leaving Salesforce and getting stored in their relevant queue on SQS:
- activate the workflow rules
- insert or edit a record
- check that under Setup > Monitoring > Outbound Messages there are no errors
- check that there is a message in the SQS queue (if not, look on CloudWatch for hints on what could be wrong)
In the next page we’ll see how to create a Talend job to process the XML message and store its data into a database.
Creating your Talend jobs
It would take me too much time to write down a step by step guide for this part so I’ll share a few resources for you to get started with Talend and I’ll share a zip file with a copy of the jobs I used for my demo, you would just need to import them in your Talend Open Studio and adjust the context or the components.
Resources:
- If you’re totally new to Talend:
Getting Started with Talend Open Studio for Data Integrations - If you know how to use Talend:
How to go serverless with Talend & AWS Lambda
Download and Import the project files
Download the files from here, then right-click on “Job Designs” and use the Import Items functionality:


Adjust the DF19 Context variables with your own database details and your
Case Safe Org ID (18-chars)


Talend job description


The two demo jobs have the same identical components and they just differ in the fields which are parsed and mapped to the database schema.
At the beginning (top-left), we open a shared connection to the database.
We then obtain the raw message from a tFixedFlowInput component using a single input field containing the context variable AWS_SQSmessage (which will be passed as an argument to the executable JAR).


The “Parse Accounts” component is a tExtractXMLField component which will read the XML contained in the input field and extract one row for each loop element (in our case each Notification tag):


All successfully parsed rows are sent forward to the “Filter OrgId” where we can check if the orgId contained in the messages is matching with the one we expect within this Context:


We can then map all fields to a relevant column in the database table: for simplicity I kept identical names (warning: PostgreSQL is case sensitive!)


Finally we store the changed data into the database using tDBOutput or tDBOutputBulkExec components.
NOTE:
Upsert operations are slower than “Insert” or “Update“ so I generally split them.
When you use tDBOutputBulkExec you can get up to 10x faster because it uses the COPY command of PostgreSQL.
tDBOutputBulkExec requires temporary CSV files to be created, Lambda functions allow you to write up to 512 MB in the /tmp/ folder.
How to test your jobs
You can test your Talend job by copying a message from the SQS queue and pasting it into the Context variable AWS_SQSmessage. I also use a lot of tLogRow ![]()


Build your Talend jobs
Talend allows you to export your jobs as executable JARs


Save the file to your preferred location:


Now we need to create a wrapper Java application that will import the Amazon SDK classes and will run the main method from our JAR.
Go to the next page to see how to do that.
AWS Lambda
Create the wrapper application
Open Eclipse IDE with Amazon SDK installed and create a new Maven project.
To be sure you’ve got all required dependencies, modify your pom.xml like the one below:
<project xmlns="http://maven.apache.org/POM/4.0.0"
	xmlns:xsi="http://www.w3.org/2001/XMLSchema-instance"
	xsi:schemaLocation="http://maven.apache.org/POM/4.0.0 http://maven.apache.org/xsd/maven-4.0.0.xsd">
	<modelVersion>4.0.0</modelVersion>

	<groupId>com.amazonaws.lambda</groupId>
	<artifactId>cardax.salesforce.account</artifactId>
	<version>1.0.0</version>
	<packaging>jar</packaging>

	<build>
		<plugins>
			<plugin>
				<groupId>org.apache.maven.plugins</groupId>
				<artifactId>maven-compiler-plugin</artifactId>
				<version>3.6.0</version>
				<configuration>
					<source>1.8</source>
					<target>1.8</target>
					<encoding>UTF-8</encoding>
					<forceJavacCompilerUse>true</forceJavacCompilerUse>
				</configuration>
			</plugin>
			<plugin>
				<groupId>org.apache.maven.plugins</groupId>
				<artifactId>maven-shade-plugin</artifactId>
				<version>3.0.0</version>
				<executions>
					<execution>
						<phase>package</phase>
						<goals>
							<goal>shade</goal>
						</goals>
					</execution>
				</executions>
			</plugin>
		</plugins>
	</build>

	<dependencyManagement>
		<dependencies>
			<dependency>
				<groupId>com.amazonaws</groupId>
				<artifactId>aws-java-sdk-bom</artifactId>
				<version>1.11.529</version>
				<type>pom</type>
				<scope>import</scope>
			</dependency>
		</dependencies>
	</dependencyManagement>

	<dependencies>
		<dependency>
			<groupId>junit</groupId>
			<artifactId>junit</artifactId>
			<version>4.12</version>
			<scope>test</scope>
		</dependency>
		<dependency>
			<groupId>com.amazonaws</groupId>
			<artifactId>aws-lambda-java-core</artifactId>
			<version>1.1.0</version>
		</dependency>
		<dependency>
			<groupId>com.amazonaws</groupId>
			<artifactId>aws-lambda-java-events</artifactId>
			<version>2.2.6</version>
		</dependency>
		<dependency>
			<groupId>com.google.code.gson</groupId>
			<artifactId>gson</artifactId>
			<version>2.8.5</version>
		</dependency>
	</dependencies>

</project>
Adjust the Java Build Path to add all relevant External JARs (i.e. the executable JAR produced by Talend and all its dependencies from the lib folder in the same zip file) :


Here’s the main java class for the Account job, you can easily adjust it for Contact by adjusting lines 16 and 35:
package com.amazonaws.lambda.cardax.salesforce;

import java.util.LinkedList;
import java.util.Map;
import com.google.gson.Gson;

/* Import Amazon libraries for the relevant event that will trigger the Lambda,
 * in this case SQS
 */
import com.amazonaws.services.lambda.runtime.Context;
import com.amazonaws.services.lambda.runtime.RequestHandler;
import com.amazonaws.services.lambda.runtime.events.SQSEvent;
import com.amazonaws.services.lambda.runtime.events.SQSEvent.SQSMessage;

/* This is the executable JAR generated by Talend, import everything in it */
import local_project.aws_lambda_sfdc_account_df19_0_2.*;


public class SFDCIntegrationAccount implements RequestHandler<SQSEvent, String> {

	@Override
	public String handleRequest(SQSEvent input, Context context) {
		try {
			/*
			 * Setting Defaults for Environmental Variables
			 */
			Map<String,String> env = System.getenv();
			final String TalendContext = env.get("TalendContext")==null || env.get("TalendContext").isEmpty() ? "DF19" : env.get("TalendContext");
			final String DBSCHEMA = env.get("DBSCHEMA")==null || env.get("DBSCHEMA").isEmpty() ? "public" : env.get("DBSCHEMA");

			/**
			 * Loop through SQS messages received from the Queue
			 */
			for(SQSMessage msg : input.getRecords()){
				final AWS_Lambda_SFDC_Account_DF19 talendJob = new AWS_Lambda_SFDC_Account_DF19();
				context.getLogger().log("*********** MESSAGE FROM SQS ***********");
				String body = msg.getBody();
				body = cleanupBody(body);

				LinkedList<String> argsList = new LinkedList<String>();
				argsList.add("--context="+TalendContext);
				argsList.add("--context_param AWS_SQSmessage=" +body);
				/** You can override Context variables taking them from System Env,
				 * otherwise the values defined in Talend will be used
				 */
				if(!DBSCHEMA.isEmpty()) argsList.add("--context_param DBSCHEMA=" +DBSCHEMA);
				String[] args = argsList.toArray(new String[argsList.size()]);

				/* Once we have our arguments we can run the Talend job with a single line of code */
				String[][] bufferOutput = talendJob.runJob(args);

				/* The job output can be sent to CloudWatch Log for further analysis */
				Gson gson = new Gson();
				String bufferIn = gson.toJson(bufferOutput);
				context.getLogger().log(bufferIn);
			}
		} catch (Exception e) {
			context.getLogger().log("Error!");
			context.getLogger().log(e.getMessage());
			e.printStackTrace();
		}
		return "OK";
	}

	/**
	 * Removing carriage returns and other unneeded characters before passing it to Talend
	 */
	private String cleanupBody(String body) {
		body = body.substring(1, body.length()-1);
		body = body.replaceAll("\\n", "");
		body = body.replaceAll("\\r", "");
		body = body.replace("\n","");
		body = body.replace("\\n","");
		body = body.replace("\\r","");
		body = body.replace("\\", "");
		return body;
	}

}
Adjust the Lambda function settings
Your code can now be packaged and uploaded as an AWS Lambda function using the AWS Toolkit for Eclipse. Right-click in your code, select AWS Lambda > Upload function to AWS Lambda… , and follow the instructions:


You will now see your Lambda function in the AWS Console, you can adjust the allocated memory, environment variables, etc.


Add a trigger for the lambda function
We can now link the Lambda function with its relevant SQS queue by clicking “+ Add Trigger“:


As soon as the Lambda function is added as trigger to the relevant SQS queue, the queued messages will be processed in batches of the size you specified [1 to 10 messages].
Test the integration
Create a record in Salesforce and verify that it is correctly inserted into the DB.
In case of issues, look for error messages on CloudWatch Logs


AWS CloudWatch
As per AWS description:
CloudWatch collects monitoring and operational data in the form of logs, metrics, and events, and visualizes it using automated dashboards so you can get a unified view of your AWS resources, applications, and services that run in AWS and on-premises. You can correlate your metrics and logs to better understand the health and performance of your resources. You can also create alarms based on metric value thresholds you specify, or that can watch for anomalous metric behavior based on machine learning algorithms. To take action quickly, you can set up automated actions to notify you if an alarm is triggered and automatically start auto scaling, for example, to help reduce mean-time-to-resolution. You can also dive deep and analyze your metrics, logs, and traces, to better understand how to improve application performance.


Follow the excellent tutorials to get started on CloudWatch on AWS: https://aws.amazon.com/cloudwatch/getting-started/


Conclusion
I hope you will find this tutorial useful.
Feel free to share your feedback or enhancements to this AWS architecture using the comments below.
I’m not an AWS expert and I’m always looking forward to learning new skills.
For example, I believe there is an easier way to reproduce this configuration using AWS CloudFormation. It is a service to describe and recreate the whole architecture setup using JSON or YAML files. If you have experience with that service, please let me know if my assumption is correct. 🙂